01

Thursday, December 24, 2015

Our Holiday Kitchen & Dining Room

Oh my gosh ONE more Sleep!! :) I actually feel pretty prepared this year.. shocker.. Everything is wrapped, presents are hidden in a big laundry basket for easy travel to under the tree! :) Hope you are in the same boat, if not, you still have one more day! Well this is the last of our Christmas Home Tours..  Scroll down to see our Dining Room and Kitchen all decked out for the holidays..

Wednesday, December 23, 2015

Holiday Decor in our Family Room

Wow 2 more sleeps till the big day!! So I know I am cutting it close with our FULL Family room reveal but here it is.. Our family room is the heart of our home, so it just made sense that it's where we set up our tree and stockings this year. Check out our full neutral French country Christmas decor in our family room below..

Thursday, December 17, 2015

DIY Musical Note Ornaments

I've been meaning to make these sheet music ornaments for a while now.. I finally found some free time the other night so I got right to it.. I'll admit its not an original idea to create I'm just so happy with how they turned out I wanted to share!! See all the details by clicking below.

Tuesday, December 15, 2015

Holiday Decor in our Living Room

Our living room got decked out for the holidays.. after all it's the first room you see when you walk into our home. I kept the look fairly traditional this year with natural elements along with touches of red and green.. See all the details by clicking below..

Friday, December 11, 2015

Our Christmas Tour - Porch & Halls...

Welcome to the first part of our holiday home.. I'm going to be honest this year was a tough one to find the time to fully decorate.. I absolutely love to decorate for the holidays but it was a tad too much with a new little one. So this year is a touch more simple, of course I still added little hand-made details to keep our Christmas home special.. just not as much as last year. I kept with the natural elements and took a more rustic, traditional approach by adding bits of red. Hope you like how it all turned out..

Saturday, December 5, 2015

Christmas Home Tour 2015


Wow its Christmas time again.. Can't believe how fast time has been flying.. I was just pregnant last year, now this year we have an almost 5 month old!! Many of you who follow me know I just love my neutrals so this holiday season I tried to add splashes of more reds and greens. So this year was a little tricky trying to be creative and still quick with 2 little monkeys around.. In all I tried to pay attention to detail while still keeping the house more minimal than years past. See our Full Christmas Home tour by clicking below...

Thursday, December 3, 2015

Christmas Banister ~ Burlap Garland

This year for Christmas I really wanted to decorate our stairs and banisters as they are a huge focal point of our main floor. So for an inexpensive alternative to the classic Greenery boxwood or pine garland, I went with cotton muslin and burlap!! Don't get me wrong I absolutely love the look of greenery its just that it gets so darn expensive for faux garland and the fresh stuff can really add up too.. especially since I have a ton of railings to cover! See more on our Burlap Garland by clicking below...

Monday, November 30, 2015

Updating old Bathroom Sinks.. while re-using old vanities

Happy Cyber Monday! Today I am sharing another little bathroom update to our Master Ensuite bathroom..We have been on quite the roll in here. It was a mission in itself to get my hubby on board with all these updates.. but once we were re-doing the shower he couldn't just ignore the grungy old sinks that we use on a day to day basis. To save money and make my hubby happy we opted to leave the existing vanities and simply changed out the old sinks and faucets. Click to see more info and sources.

Wednesday, November 25, 2015

Master Ensuite Shower Reveal

Yay!! We finally reno'd our shower!!! Since we purchased this house a little over 2 years ago.. I have been itching to install a new shower. First because the shower was dated and not to my taste and secondly, it was getting older with grout cracks and a peeling, cracked ceiling. And soon enough we would find we had a LEAK too!! A while back I replaced all the old disgusting grout and realized at that time we were really getting down on the lifespan left of this 14 year old shower. It was all just a band aid for our looming water leak... One day we were all sitting in the living room when my hubby looked up and sure enough we had wet water marks all in our ceiling. The timing couldn't of been worse! I had just given birth to our son. In the end the shower turned out exactly how I had always envisioned it..  See all our shower details by clicking below... 

Tuesday, November 17, 2015

Building a pull out Vanity Drawer

Today I am sharing a little weekend project we were up to recently.. I don't know about you but I can NEVER have to much storage.. for me I have a lot of various cosmetic items and never enough space to store them. Our house was built 14 years ago and for some strange reason the builder never installed drawers.. a girl needs a DRAWER!! so luckily my talented hubby built one for me and I did all the pretty work.. Here is how we made a Vanity Drawer for our Master Bath..

Monday, November 9, 2015

Garage Sale find Sign Tweak

I found this wood welcome sign at a garage sale during the summer.. It was way to country for my style but I loved the arch shape at the top of wood.. and for only $2 I thought why not?? So once I got it home I had to find a wall for it (I am running out of prime wall space!).. I had the perfect empty spot in my Kitchen.. so I wanted it to be Kitchen themed.. so keeping it slightly country.. more french country and updated I went with a Farm theme. Farm Fresh Apples only 25 cents.. Now it adds a touch of vintage charm to the corner of our kitchen.

Monday, November 2, 2015

Family room Board and Batten wall

For a while now I have been very bored with the paint colour in this room, its the original paint to the original owners. It's hard because it's not an ugly paint colour, it's just that this is an open space to the rest of our house and it has 20ft ceilings so its just a lot of BEIGE! Originally I wanted to have the whole room painted, but when we got the quote it turned out to be quite costly due to the high ceiling height. So instead I came up with other ideas to brighten up the look.. one being updating the big drywall media unit and adding a bit more interest and brightness by adding a Board and Batten pattern to our curved wall.. See all the details by clicking below...

Monday, October 26, 2015

Basement Wainscoting Reveal

So I have been meaning to reveal our basement for a while now.. We added a simple Box wainscoting  to the lower half of all our basement walls. What a difference it made!! It adds character and the white just lends to the coastal look we were going for. See all the basement details by clicking below...

Monday, October 19, 2015

Vintage Frames DIY

So I found these vintage frames last year at a garage sale.  I mean 25 cents each just can't be beat! I knew with a little updating they would make an amazing wall vignette. See all the details by clicking below..

Monday, October 12, 2015

Using oars as wall decor

It all started with a great garage sale find a few months back.. I found these 2 oars at a street sale for $5 for the pair!! I knew I wanted another one to complete our family room wall and the other was used in our sons nursery. See how they look now by clicking below.
   

Thursday, October 8, 2015

Wooden Alphabet Nursery Wall

 Who doesn't love a good alphabet wall??  For our daughters nursery, we installed a plate rail and leaned the whole alphabet with some numbers against the wall, It's definitely helped her learn her letters faster. You can see her full Nursery Reveal HERE. So when I started planning our son's nursery I knew I wanted to incorporate an Alphabet wall in some way.  His wall is made up of simple wooden alphabet letters from this Etsy shop Gallery wood letters. I just painted the natural wood in Benjamin Moore Newburyport Blue to make them flow in his nursery. Lastly I painted stripes on the large A and Z to complete the look.. See it by clicking below..

Monday, October 5, 2015

DIY Basket Weaved Lumbar Pillow Cover

I was at it again, making MORE pillow covers.. See how I made this Jute Webbing Basket weaved pillow cover by clicking below for full details...

Thursday, October 1, 2015

Fall Home Tour Part 2

Today is the last part of our Fall home tour, I just love decorating seasonally though I will admit this year it was a little challenging to find the time with an 8 week old and 2 and a half year old!! It came down to basically deciding where most stuff was going virtually in my mind as I paced around our home with a fussing, burping or sometimes sleeping baby.. Oh the things Mom's do! I have to say it really makes me feel better keeping up with something that I LOVE to do even though I know I should probably be napping when they do.. See how we decorated the rest of our house for fall by clicking below..

Monday, September 28, 2015

Fall Home Tour 2015 Part 1

Happy Fall Everyone!! I just can't believe summer is officially over, It felt like it flew by super quick this year??.. Ah well on to the next beautiful season, Fall! It's such a pretty time of year with all the leaves changing colour.. This year around here we are keeping things fairly simple with subtle nods to Autumn by incorporating lots of natural elements. See it all by clicking link below...

Friday, September 18, 2015

Fall inspiration..


As you may remember things have been rather busy around here for us with 2 little ones and very little sleep so I am going to keep today's post short and sweet.. Here are some of the ways I decorated for fall in past years.. We are a little behind this year with everything going on but once I have our house 'Fall ready' I will be posting it ;). Happy decorating!

Monday, September 14, 2015

Vintage Cabinet display Makeover

A while back I purchased this fabulous solid Pine Cabinet at an online antique auction for a mere $80. It didn't NEED any real work, I just wasn't a fan of the dirty creamy colour tone. So I dry rubbed it with BM Cloud white paint and a cloth to soften and brighten the original finish and guess what it worked!!

Tuesday, September 8, 2015

Painted Mirror Collage

So with all the changes going on around here, we are slowly trying to get our guest rooms back in order.. with the nursery almost complete. You may have already seen these mirrors in our Guest bedroom but today I just wanted to show the full mirror transformation FINALLY!! They have really helped to update our guest bedroom to a more light and fresh look I love...  

Wednesday, September 2, 2015

New Vintage Headboard for Guest Bedroom

This post is a long time coming .. I painted this headboard months ago and I am just finally getting around to sharing it, life gets busy sometimes!! The headboard was a ReStore find for only $10!! I loved the style and detail and hello the price. This will eventually go into our daughters big girl bedroom but for now its in our guest bedroom.  I want to really lighten the room and give the bedroom a little more of a french country look to flow with other areas of our home. It is still a work in progress..

Friday, August 28, 2015

DIY Chalkboard using Meter sticks as Frame

So I have been on a roll to finish our sons nursery if you couldn't tell ;).. So today I am going to share a chalkboard I made for his room, now I know he is only a baby and clearly will not be using a chalkboard for a while BUT our 2 year old daughter sure will and loves it..  

Monday, August 24, 2015

Painted Vintage Trunk Makeover

I have had this vintage trunk in our storage area about 5 years now, I have been meaning to paint it for a while now, I or should I say my hubby finally got around to painting it a couple weeks ago. See another pre-baby arrival makeover .. It's a far cry from the bright blue trunk that it was before.. see all the details below...

Friday, August 21, 2015

Window Seat with Storage Reveal

I am so excited to be finally sharing our new window seat in our sons nursery. Many steps and love went into this project. The window seat really has turned out to be the focal point of our son James nursery.. It sets the tone for whole his room. My mom was a huge part of his nursery reveal, both her and I made most of the pillows ourselves with tons of love.. Thanks MOM!! I couldn't be happier with how it all turned out. Click the link for more details..

Wednesday, August 19, 2015

Welcome baby James!!

Our baby boy was born last week. Baby James weighed 6 lbs 10 oz and arrived 4 days early. It's been a crazy couple weeks with a growing 2 year old and a newborn.. I feel overwhelmed and so blessed all at the same time!! Over the next few weeks I will be sharing some before and afters that we finished just before our little bundle of joy arrived and taking some time to enjoy this special time with our kids. Hope everyone else is having a great Summer!!


Monday, August 17, 2015

Powder Bath Updates

Before Baby #2 got here.. I was on a mission.. and yes it was a Mission just ask my hubby.. the most PATIENT man ever!! God he loves me!! I had mini reno after mini makeover to be completed before his big arrival .. And I am happy to say we accomplished almost everything on my list ;) 

Wednesday, August 12, 2015

AHOY tea towel into a pillow

I found this cute tea towel at Homesense a while ago for $5.99 and loved the style and the size was perfect to make a pillow.. I loved the embroidered polka dot anchor but knew I would have to cover the ruffles to make it a bit more masculine for my little guys nursery.

Saturday, August 8, 2015

DIY Canisters for Boys Nursery

I found these Vintage kitchen canisters at a Thrift shop a year or so ago for $6.. I finally decided to use them as cute little storage jars for our sons room. It was a fast and simple makeover, with a little spray paint, gorilla glue and dollar store toys.. see all the details below..

Sunday, August 2, 2015

DIY industrial pipe shelf

I just built this super simple industrial shelf for our son's nursery for under $25 and thought I would share it. The hardest part was finding the parts at Home Depot. I was looking around online for a open shelving option, I found some great ones but with all the things I still wanted to do and buy for the nursery, they were out of our price range.. so when you can't afford it, I always try and make it!! See how to build one for yourself below..

Friday, July 31, 2015

Boy Nursery Updates

This is what we have been up to lately over here as we prepare for baby James arrival. We moved the Ikea Hemnes dresser from our Daughters room into his future nursery. In order to make this dresser flow in our sons nursery I changed out the pink knobs to these simple knotted Jute knobs. I kept the RH Baby and Child Marlowe dresser topper, It's certainly not necessary but I really like the look of it and how completes the change pad so it has a nice nestled home. And how all the accessories have a organized spot to the right of the change pad.  
I just love stripes so when I found this nautical inspired navy and white striped change pad cover on Etsy DesignsbyChristyS so I just knew I had to have it for his nursery. 
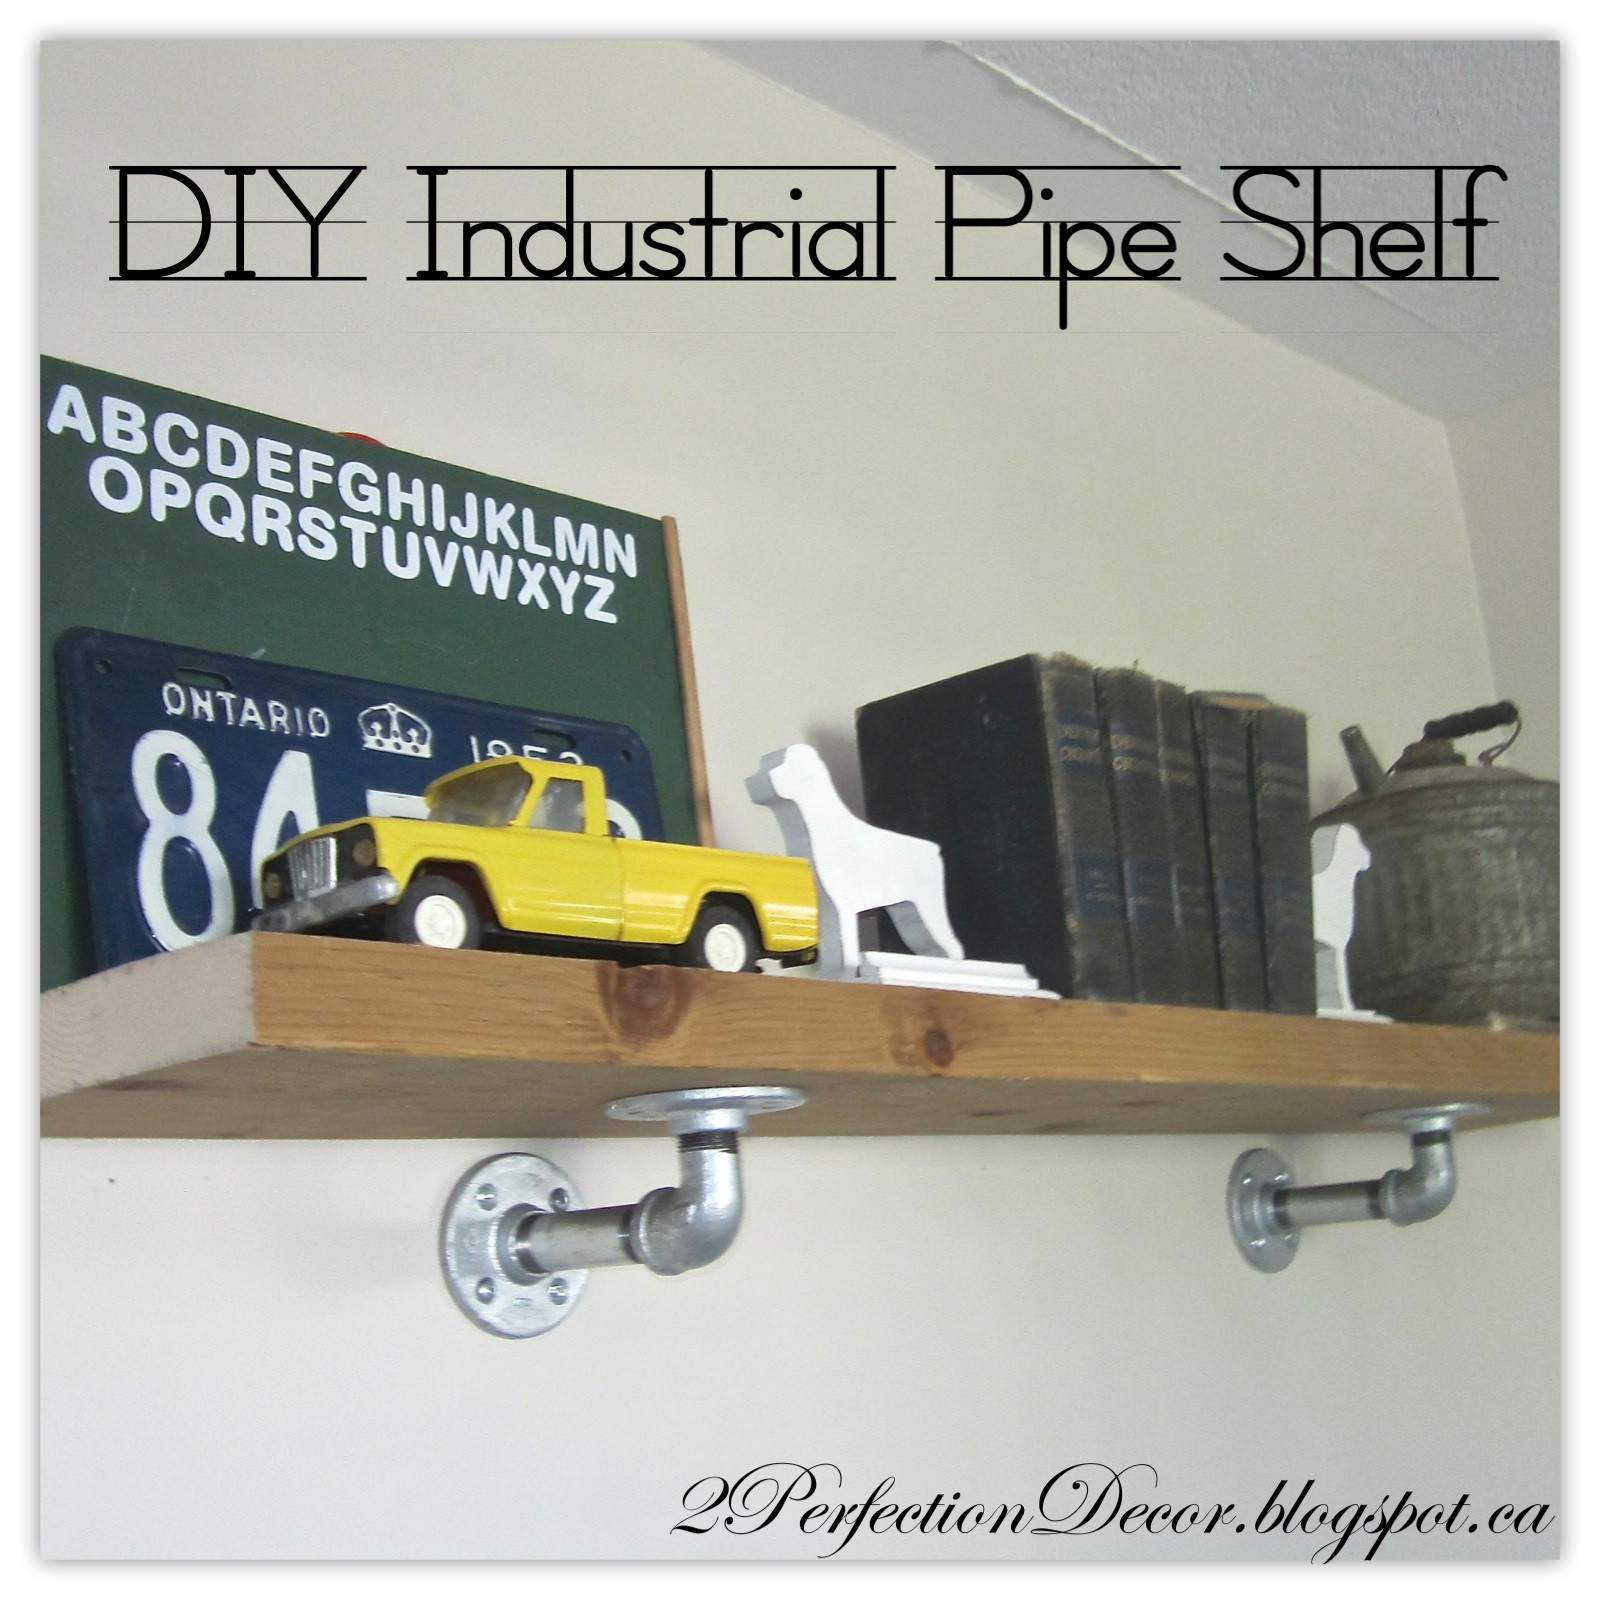
Another little DIY update is I finally got around to is painting the wooden bookends I found a while back at a thrift shop for $1.. I painted them with BM Cloud White and lightly sanded the edges for a subtle distressed look. Now they flow perfectly with his nursery decor. 
Stay tuned for more nursery updates..

You can see our daughters Shabby Chic Nursery HERE
Thanks for visiting!!

Don't Miss a post... Follow me by Email or Bloglovin!

Tuesday, July 28, 2015

Girly Dresser Makeover

Our daughter Elle is getting so big so fast.. She turned 2 in April :) So for her big girl room we decided to change things up and get her a more girly dresser.. I found this dresser at our local ReStore a few months ago for $65. Overall it was in great shape, with perfect and clean drawers for our little one. The only thing was the colouring was all wrong, it was the original dated mahogany French provincial style dresser. But with a little paint its now a pretty girly-girl dresser.. She the full details below...

Saturday, July 25, 2015

Our Summer Kitchen

Summer is here, and to make our home fresh and summery I added pops of blue and white throughout our home.. Maybe its because I am pregnant with a baby Boy so I went a little BLUE crazy!!! Take a tour of our Summer Kitchen by clicking below..

Wednesday, July 22, 2015

Our Summer Dining Room

I had a ton of fun creating our Summer Dining room.. I got to decorate our newly made over Farm Table. I kept it soft and coastal with touches of light blue. See the full reveal below..

Sunday, July 19, 2015

Our Summer Living Room

The blue theme continued throughout our main floor into our Living room.. not sure if its my little guy growing inside me that's making me go a little BLUE CRAZY! But I like it! I have always loved soft aqua blue's and greens so I ended up using a lot of decor items from our old guest bedroom A.K.A baby James future nursery.. So its nice that my pretty decor items had a new home to go to.  See our full living room reveal below..

Thursday, July 16, 2015

Our Summer Family Room

So here it is our Summer Family Room.. Its nautical surprise, surprise! With more colour than normal for me.. I stuck with a mix of classic tones like navy, beige's, blues and whites on our whole main floor this year.
  

Monday, July 13, 2015

Wicker Nesting table Makeover

This was one simple, yet time consuming mini makeover. I bought these great wicker nesting tables at a online auction for $20... See all the details below..

Saturday, July 11, 2015

Summer changes to our Master bedroom

With summer upon us, I felt it was time to change up our bedroom colour scheme a little bit.. shall we say lighter and brighter... So I went with mellow yellow theme. First of all let me say those who follow me know I'm not big on colour, I'm a very neutral girl at heart. But this summer I thought I'd brighten things up and I have to tell you I'm actually loving it! Check out our bedroom below..